목차
- swagger란?
- springdoc과 springfox
- spring boot에 적용하기
- 결론
Swagger란?
API Documentation & Design Tools for Teams | Swagger
swagger.io
Swagger는 OpenAPI Specification(OAS)의 구현을 위한 라이브러리이다.
API의 사양을 명세하고 문서화하여 관리할 수 있도록 도와준다.
여기서 OpenAPI Specification(OAS)란,
What is the OpenAPI Specification?
The OpenAPI Specification (OAS) defines a standard, programming language-agnostic interface description for HTTP APIs, which allows both humans and computers to discover and understand the capabilities of a service without requiring access to source code, additional documentation, or inspection of network traffic. When properly defined via OpenAPI, a consumer can understand and interact with the remote service with a minimal amount of implementation logic. Similar to what interface descriptions have done for lower-level programming, the OpenAPI Specification removes guesswork in calling a service.
참고 : OpenAPI Specification v3.1.0
HTTP API에 대한 표준 인터페이스 설명을 정의하는 OpenAPI 사양을 말한다.
이를 통해 소스 코드, 기타 문서나 네트워크 트래픽 검사에 접근하지 않고도서비스의 기능을 알아보고 이해가 가능하게 된다.
간단히 말하자면 REST API를 기술하는 표준인 것이다.
사용할 라이브러리
Spring에서 Swagger를 사용하며 API 문서화를 쉽게 할 수 있도록 도와주는 라이브러리는
| springfox-swagger | springdoc-openapi |
위 2가지가 존재한다.
이 둘 중
springdoc-openapi가
최근까지 commit이 이뤄지고 있고, 점점 Springdoc을 사용하는 추세가 형성되었다고 판단하여
springdoc을 사용하고자 한다.
Spring Boot에 적용하기
본 포스트는 gradle 프로젝트로 진행되었습니다.
1. 의존성 추가
Maven Repository: org.springdoc » springdoc-openapi-ui » 1.6.9
org.springdoc springdoc-openapi-ui 1.6.9 // https://mvnrepository.com/artifact/org.springdoc/springdoc-openapi-ui implementation group: 'org.springdoc', name: 'springdoc-openapi-ui', version: '1.6.9' // https://mvnrepository.com/artifact/org.springdoc/spri
mvnrepository.com
build.gradle
...

dependencies {
	...
	/*
	Springdoc OpenAPI UI
	 */
	implementation 'org.springdoc:springdoc-openapi-ui:1.6.9'
}

...
build.gradle에 springdoc을 위해 의존성을 추가해주었다.
2. 필요한 Bean 등록
@Configuration
public class SwaggerConfig {
@Bean
public GroupedOpenApi jwtApi() {
return GroupedOpenApi.builder()
.group("jwt-api")
.pathsToMatch("/**")
.build();
}
@Bean
public OpenAPI customOpenAPI() {
return new OpenAPI()
.components(new Components())
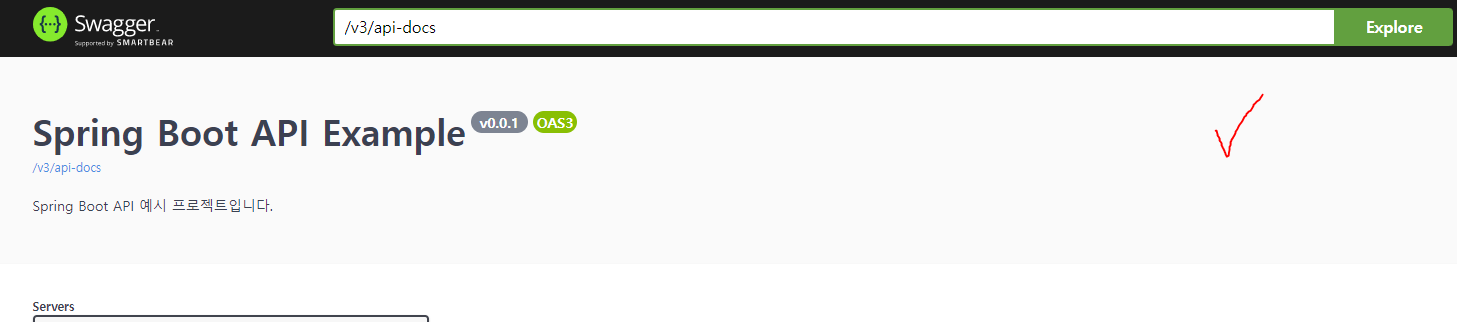
.info(new Info().title("Spring Boot API Example")
.description("Spring Boot API 예시 프로젝트입니다.")
.version("v0.0.1"));
}
}스프링 부트의 Entry 포인트 클래스에 설정해줘도 상관없지만
따로 설정 클래스를 생성하여 Bean들을 명시해주었다.
OpenAPI Bean은 기본적인 제목, 버전 그리고 설명에 관한 설정을 담고있다.

위 설정의 결과는 다음과 같이 나타나게 된다.
GroupedOpenApi Bean은 그룹을 생성해주는 Bean으로,
설정해주지 않은 경우
위와 같이 나타나는데,
@Bean
public GroupedOpenApi jwtApi() {
  return GroupedOpenApi.builder()
     .group("jwt-api")
     .pathsToMatch("/**")
     .build();
}
이렇게 설정해준다면
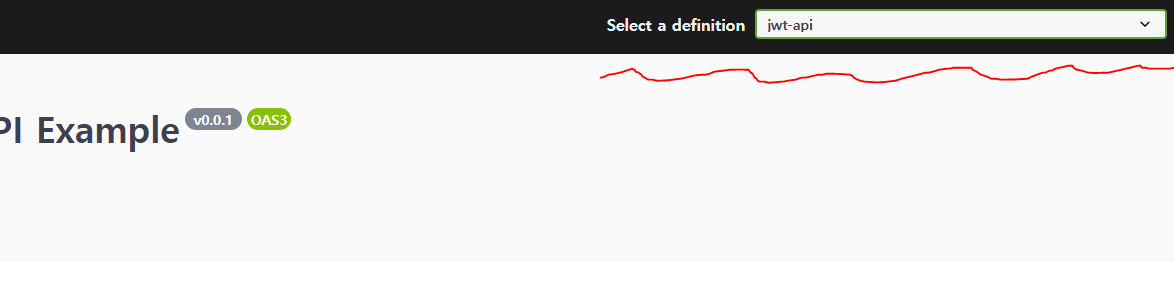
이렇게 문서 페이지에서 그룹을 선택할 수 있게 된다.
즉, 현재는 하나의 그룹 뿐이지만 여러 그룹을 설정하여 더 가독성 좋은 문서를 만들 수 있는 것이다.
3. application.yml 파일 설정
https://springdoc.org/#properties
OpenAPI 3 Library for spring-boot
Library for OpenAPI 3 with spring boot projects. Is based on swagger-ui, to display the OpenAPI description.Generates automatically the OpenAPI file.
springdoc.org
springdoc:
  swagger-ui:
    path: /swagger-ui.html
    use-root-path: true
다양한 옵션이 존재하는데,
우선
Swagger UI 페이지를 로드할 경로를 설정해주고,
root 경로에 api 문서 페이지를 사용하겠다고 해주었다.
4. Controller 설정
다음은 AuthController에 작성한 코드 예시이다.
AuthController
@Tag(name = "Auth", description = "인증 관련 api")
@RestController
@RequestMapping("/auth")
@RequiredArgsConstructor
public class AuthController {
  private final AuthService authService;

  @Operation(summary = "회원가입", description = "회원가입 메서드입니다.")
  @PostMapping("/signUp")
  public SignUpRes signUp(@Validated SignUpReq signUpReq) {
    return authService.signUp(signUpReq);
  }

  ...
}
반복되는 내용이기 때문에 signUp 메서드를 제외한 나머지는 생략하였다.
위처럼 코드를 작성할 경우,

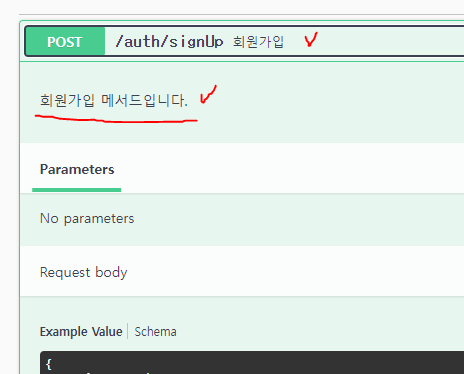
위와 같이 api들이 보여진다.
물론 따로 설정하지 않아도 api들이 기본적으로 나타나긴 하지만,
추가적인 설정을 해주었을 때 더 좋은 문서를 만들 수 있는 것이다.
@Tag
: api의 그룹을 설정한다.
| name | 태그 이름 |
| description | 태그 설명 |
@Operation
: api의 상세정보를 설정한다.
| summary | 요약 설명 |
| description | 상세 설명 |
추가적인 정보는 아래 포스트에 잘 정리되어있다.
Open API 3.0 + Swagger v3 상세설정
[Spring Boot Tutorial] 15. Open API 3.0 + Swagger v3 상세설정
api 그룹 설정 : @Tag api Schema 설정 : @Schema api 상세 정보 설정 : @Operation api response 설정 : @ApiResponse api parameter 설정 : @Parameter 이전시간에 OpenAPI info 정보만 설정했었습니다. Schemas..
blog.jiniworld.me
Swagger로 생성한 문서 페이지에서 메서드를 테스트할 수도 있다.

적절하게 Parameter를 설정하고 실행하면,

이렇게 결과를 확인할 수 있다.
결론
지금까지 정말 간단한 설정만 한 것이며,
DTO에도 자세한 설명을 추가하는 등 여러 설정이 가능하다.
OpenAPI를 문서화하기 위해 Swagger를 사용하여 진행하였고,
Swagger 3를 사용하기 위해 Springdoc을 사용하였다.
개발자 입장에서 구현한 API를 효율적으로 공유하고 누구나 쉽게 활용할 수 있도록
문서화하는 것은 매우 중요하다고 생각하며, 앞으로 아직 사용하지 못해본 기능들도 사용해보며
더 깔끔하고 명확하게 시각화해보도록 할 것이다.
참고자료
whats-the-difference-between-swagger-and-openapi
springdoc.org/#getting-started
github.com/springdoc/springdoc-openapi-demos
'Backend > Spring' 카테고리의 다른 글
| [Spring Boot] Redis와 함께 Refresh Token 구현하기 (0) | 2022.06.17 |
|---|---|
| Spring Security - JWT (12) | 2022.06.11 |
| Spring Security - 세션 인증 (4) | 2022.05.29 |
| @RequestBody, @ModelAttribute 그리고 Argument Resolver (2) | 2022.05.20 |
| [Spring Boot] Spring Security 적용하기 - 암호화 (2) | 2022.05.20 |