https://hou27.tistory.com/entry/Spring-Security-JWT
Spring Security - JWT
이번에는 지난번 세션 인증을 적용한 포스트에 이어서 JWT를 이용한 로그인을 구현해보도록 하겠다. 지난 포스트 https://hou27.tistory.com/entry/Spring-Security-%EC%84%B8%EC%85%98-%EC%9D%B8%EC%A6%9D Spring..
hou27.tistory.com
이번엔 위 포스트에서 진행한 것에 약간의 수정과 추가를 통해
Spring Security + JWT + Spring Data Redis 의 조합을 완성해보도록 하겠다.
진행 순서
- Redis 설치
- Spring Boot 프로젝트에 Redis 적용
- 실습을 통한 동작 확인
이 포스트는 Window에서 WSL2를 사용하여 진행합니다.

1. WSL2에 Redis 설치
Install Redis on WSL2
https://redis.io/docs/getting-started/installation/install-redis-on-windows/
Install Redis on Windows
Use Redis on Windows for development
redis.io
curl -fsSL https://packages.redis.io/gpg | sudo gpg --dearmor -o /usr/share/keyrings/redis-archive-keyring.gpg

echo "deb [signed-by=/usr/share/keyrings/redis-archive-keyring.gpg] https://packages.redis.io/deb $(lsb_release -cs) main" | sudo tee /etc/apt/sources.list.d/redis.list

sudo apt-get update
sudo apt-get install redis
위 일련의 커맨드들을 통해 WSL에 Redis를 설치할 수 있다.
Redis (Remote Dictionary Server)
Redis 서버를 사용하는 이유는 다음과 같았다.
우선 서버에 Refresh Token을 저장해야하는데, 영구적으로 필요한 데이터도 아닌터라
귀찮기도 하고 간단하게 저장해서 사용하고 싶었는데
마침 아직까지 사용해보지 않았던 Key - Value DB인 Redis를 사용한 레퍼런스가 많아 살펴보니
인메모리 상태에서 데이터를 처리하여 다른 DB들보다 빠르고 가볍다는 장점이 있다는 것을 알게 되었다.
In-Memory란,
말 그대로 메모리에서 데이터를 처리하는 것으로
메인 메모리인 RAM에 데이터를 올려 사용한다.
물론 Refresh Token을 따로 분리하여 관리할 만큼 I/O가 빈번하게 일어날 것 같진 않지만,
간편하고 빠른 RAM에 저장하는 특성에 따라 캐싱 서버로 많이 이용되기 때문에
토큰을 임시로 저장할 서버로 사용해보고자 하였다.
2. Gradle 프로젝트에 Redis 적용
build.gradle
/*
Redis
 */
implementation 'org.springframework.boot:spring-boot-starter-data-redis'
우선 의존성을 추가해주고,
RedisConfig (Redis를 위한 설정파일)
@Configuration
public class RedisConfig {
  @Value("${redis.host}")
  private String redisHost;

  @Value("${redis.port}")
  private int redisPort;

  /*
  RedisTemplate을 이용한 방식

  RedisConnectionFactory 인터페이스를 통해
  LettuceConnectionFactory를 생성하여 반환
   */
  @Bean
  public RedisConnectionFactory redisConnectionFactory() {
    return new LettuceConnectionFactory(redisHost, redisPort);
  }

  @Bean
  public RedisTemplate<String, String> redisTemplate() {
    // redisTemplate를 받아와서 set, get, delete를 사용
    RedisTemplate<String, String> redisTemplate = new RedisTemplate<>();
    /**
     * setKeySerializer, setValueSerializer 설정
     * redis-cli을 통해 직접 데이터를 조회 시 알아볼 수 없는 형태로 출력되는 것을 방지
     */
    redisTemplate.setKeySerializer(new StringRedisSerializer());
    redisTemplate.setValueSerializer(new StringRedisSerializer());
    redisTemplate.setConnectionFactory(redisConnectionFactory());

    return redisTemplate;
  }
}
Spring Boot 프로젝트에서 Redis를 사용하기 위한 설정을 해주었다.
참고자료 : https://www.hides.kr/1085
Spring Data Redis로 레디스 연동하는 방법
개요 스프링에는 Redis와 연동하는 여러가지 방법이 존재하는데 Data JPA와 비슷하게 Data Redis라는 라이브러리를 제공한다. Lettuce와 Jedis 2가지 구현체를 통해 통신할 수 있는 방법이 있는데, Lettuce는
www.hides.kr
별도의 설정이 필요없는 Lettuce Redis Client를 통해
RedisTemplate의 메서드로 Redis 서버에 명령을 수행할 수 있도록 하였다.
RedisTemplate (Spring Data Redis 2.7.0 API)
Helper class that simplifies Redis data access code. Performs automatic serialization/deserialization between the given objects and the underlying binary data in the Redis store. By default, it uses Java serialization for its objects (through JdkSerializat
docs.spring.io
Auth Service
@Service
@RequiredArgsConstructor
public class AuthServiceImpl implements AuthService {
  ...
  private final RedisTemplate<String, String> redisTemplate;

  @Value("${jwt.token.refresh-token-expire-length}")
  private long refresh_token_expire_time;

 ...

  @Override
  public ResponseEntity<TokenDto> signIn(SignInReq signInReq) {
    try {
      Authentication authentication = authenticationManager.authenticate(
          new UsernamePasswordAuthenticationToken(
              signInReq.getEmail(),
              signInReq.getPassword()
          )
      );

      String refresh_token = jwtTokenProvider.generateRefreshToken(authentication);

      TokenDto tokenDto = new TokenDto(
          jwtTokenProvider.generateAccessToken(authentication),
          refresh_token
      );

      // Redis에 저장 - 만료 시간 설정을 통해 자동 삭제 처리
      redisTemplate.opsForValue().set(
              authentication.getName(),
              refresh_token,
              refresh_token_expire_time,
              TimeUnit.MILLISECONDS
          );

      HttpHeaders httpHeaders = new HttpHeaders();
      httpHeaders.add("Authorization", "Bearer " + tokenDto.getAccess_token());

      return new ResponseEntity<>(tokenDto, httpHeaders, HttpStatus.OK);
    } catch (AuthenticationException e) {
      throw new CustomException("Invalid credentials supplied", HttpStatus.UNPROCESSABLE_ENTITY);
    }
  }

  @Override
  public ResponseEntity<TokenDto> regenerateToken(RegenerateTokenDto refreshTokenDto) {
    String refresh_token = refreshTokenDto.getRefresh_token();
    try {
      // Refresh Token 검증
      if (!jwtTokenProvider.validateRefreshToken(refresh_token)) {
        throw new CustomException("Invalid refresh token supplied", HttpStatus.BAD_REQUEST);
      }

      // Access Token 에서 User email를 가져온다.
      Authentication authentication = jwtTokenProvider.getAuthenticationByRefreshToken(refresh_token);

      // Redis에서 저장된 Refresh Token 값을 가져온다.
      String refreshToken = redisTemplate.opsForValue().get(authentication.getName());
      if(!refreshToken.equals(refresh_token)) {
        throw new CustomException("Refresh Token doesn't match.", HttpStatus.BAD_REQUEST);
      }

      // 토큰 재발행
      String new_refresh_token = jwtTokenProvider.generateRefreshToken(authentication);
      TokenDto tokenDto = new TokenDto(
          jwtTokenProvider.generateAccessToken(authentication),
          new_refresh_token
      );

      // RefreshToken Redis에 업데이트
      redisTemplate.opsForValue().set(
          authentication.getName(),
          new_refresh_token,
          refresh_token_expire_time,
          TimeUnit.MILLISECONDS
      );

      HttpHeaders httpHeaders = new HttpHeaders();

      return new ResponseEntity<>(tokenDto, httpHeaders, HttpStatus.OK);
    } catch (AuthenticationException e) {
      throw new CustomException("Invalid refresh token supplied", HttpStatus.BAD_REQUEST);
    }
  }
}
RedisConfig를 통해 등록한 RedisTemplate Bean을 사용하여
Refresh Token을 컨트롤해주는 로직을 작성하였다.
Auth Controller
@RestController
@RequestMapping("/auth")
@RequiredArgsConstructor
public class AuthController {
  private final AuthService authService;

  ...

  @PostMapping("/regenerateToken")
  public ResponseEntity<TokenDto> regenerateToken(@Validated RegenerateTokenDto refreshTokenDto) {
    return authService.regenerateToken(refreshTokenDto);
  }
}
그리고 AuthController에는 토큰을 재발행하는 api를 추가로 구성해주었다.
3. 실습을 통한 동작 확인
- 우선 Redis Server를 실행 ( h2 DB를 사용하고 있어 해당 DB도 실행해두었다. )
sudo service redis-server start
- 로그인을 진행

access_token과 refresh_token이 정상적으로 발행되는 것을 확인할 수 있다.
- 발급받은 토큰이 정상 작동하는지 확인

이전 포스트에서 토큰의 정보를 통해 자신의 정보를 조회할 수 있게하도록 한
/user/profile 요청에 정상적인 응답이 반환되는 것을 확인할 수 있었다.
- Refresh Token을 통해 재발급
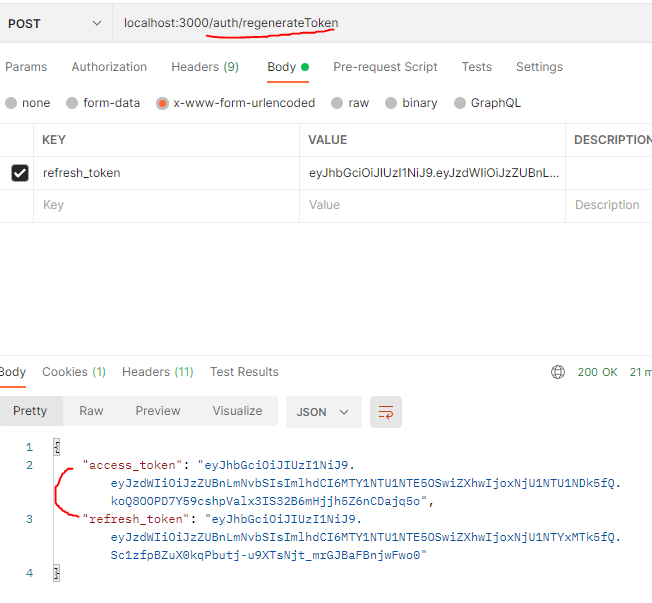
refresh_token에 발급받았던 refresh token 값을 담아
/auth/regenerateToken으로 post 요청을 보냈더니
다시 두 가지 토큰 모두를 발급해주는 것을 확인할 수 있었다.
- 재발급 받은 토큰으로 다시 확인

재발급 받은 Access Token으로 다시 프로필을 조회했더니
정상적으로 작동하는 것을 확인할 수 있었다.
성공!!
+ Redis CLI를 통해 저장된 값 확인해보기

redis-cli로 Redis Command Line interface에 접속하고,
keys *를 통해 모든 key 값들을 조회한 후,
get [key]로 key를 통해 원하는 value를 조회할 수 있다.

전체 코드는 아래 레포지토리에서 확인할 수 있습니다.
https://github.com/hou27/spring-boot-jwt-example/tree/jwt-api
GitHub - hou27/spring-boot-jwt-example: Jwt example with Spring Boot
Jwt example with Spring Boot. Contribute to hou27/spring-boot-jwt-example development by creating an account on GitHub.
github.com
참고자료
'Backend > Spring' 카테고리의 다른 글
| [Spring boot] Swagger로 API 문서화하기 (0) | 2022.07.02 |
|---|---|
| Spring Security - JWT (12) | 2022.06.11 |
| Spring Security - 세션 인증 (4) | 2022.05.29 |
| @RequestBody, @ModelAttribute 그리고 Argument Resolver (2) | 2022.05.20 |
| [Spring Boot] Spring Security 적용하기 - 암호화 (2) | 2022.05.20 |