이번에는 지난번 세션 인증을 적용한 포스트에 이어서
JWT를 이용한 로그인을 구현해보도록 하겠다.
지난 포스트
https://hou27.tistory.com/entry/Spring-Security-%EC%84%B8%EC%85%98-%EC%9D%B8%EC%A6%9D
Spring Security - 세션 인증
지난번에 Spring Security를 적용했었는데, Spring Security 적용하기 [Spring Boot] Spring Security 적용하기 - 암호화 프로젝트를 진행하면서 사용자 시스템을 구축한다면 필연적으로 인증 로직도 구현해야한
hou27.tistory.com
이번 포스트는
https://github.com/murraco/spring-boot-jwt
GitHub - murraco/spring-boot-jwt: JWT auth service using Spring Boot, Spring Security and MySQL
JWT auth service using Spring Boot, Spring Security and MySQL - GitHub - murraco/spring-boot-jwt: JWT auth service using Spring Boot, Spring Security and MySQL
github.com
위 레포지토리를 주로 참고하여 작성하였습니다.
시작하기 전에..
Security Config
우선 세션 인증을 사용할 때와 또 달라진 설정 파일의 모습이다.
@EnableWebSecurity
@RequiredArgsConstructor
public class SecurityConfig {
  // 추가된 jwt 관련 친구들을 security config에 추가
  private final JwtTokenProvider jwtTokenProvider;
  private final JwtAccessDeniedHandler jwtAccessDeniedHandler;
  private final JwtAuthenticationEntryPoint jwtAuthenticationEntryPoint;

  @Bean
  public BCryptPasswordEncoder passwordEncoder() {
    return new BCryptPasswordEncoder();
  }

  @Bean
  public AuthenticationManager authenticationManager(
      AuthenticationConfiguration authenticationConfiguration
  ) throws Exception {
    return authenticationConfiguration.getAuthenticationManager();
  }

  @Bean
  public SecurityFilterChain filterChain(HttpSecurity http) throws Exception {
    // Disable csrf to use token
    http
        .csrf().disable();

    //
    http
        .authorizeRequests()
        .antMatchers(
            "/",
            "/auth/signUp",
            "/user/userList",
            "/auth/signIn*",
            "/favicon.ico"
        ).permitAll()
        .anyRequest().authenticated();

    // No session will be created or used by spring security
    http
        .sessionManagement()
        .sessionCreationPolicy(SessionCreationPolicy.STATELESS);

    // exception handling for jwt
    http
        .exceptionHandling()
        .accessDeniedHandler(jwtAccessDeniedHandler)
        .authenticationEntryPoint(jwtAuthenticationEntryPoint);

    // Apply JWT
    http.apply(new JwtSecurityConfig(jwtTokenProvider));

    return http.build();
  }
}
다양한 변화가 있는데, 지금부터 살펴보도록 하겠다.
Spring Security를 통한 Jwt 적용
Jwt를 사용하기 위해 구현해야 할 것은 크게 기본적으로
- Jwt 토큰 제공을 위한 JwtTokenProvider
- HTTP Request에서 토큰을 읽어 들여 정상 토큰이면 Security Context에 저장하는 JwtTokenFilter
이렇게 2개이다.
그리고 Spring Security에 적용하기 위해 구현해야 할 것은 기본적으로
- Jwt Filter를 Spring Security Filter Chain에 추가하기 위한 JwtSecurityConfig
- 기본적으로 Spring Security 설정을 위한 SecurityConfig
이다.
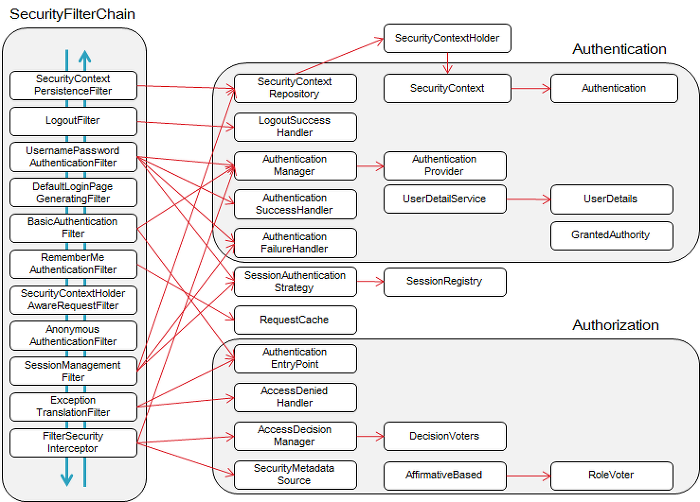
Authentication Token을 Authentication Manager가 넘겨받아
Authentication 객체를 생성하고, 이를 Provider에게 전달하여 Token을 생성하게 된다.
JwtTokenProvider
@Component
public class JwtTokenProvider {
  @Value("${jwt.token.secret-key}")
  private String secret_key;

  @Value("${jwt.token.expire-length}")
  private long expire_time;

  @Autowired
  private UserDetailsService userDetailsService;

  /**
   * 적절한 설정을 통해 토큰을 생성하여 반환
   * @param authentication
   * @return
   */
  public String generateToken(Authentication authentication) {

    Claims claims = Jwts.claims().setSubject(authentication.getName());

    Date now = new Date();
    Date expiresIn = new Date(now.getTime() + expire_time);

    return Jwts.builder()
        .setClaims(claims)
        .setIssuedAt(now)
        .setExpiration(expiresIn)
        .signWith(SignatureAlgorithm.HS256, secret_key)
        .compact();
  }

  /**
   * 토큰으로부터 클레임을 만들고, 이를 통해 User 객체를 생성하여 Authentication 객체를 반환
   * @param token
   * @return
   */
  public Authentication getAuthentication(String token) {
    String username = Jwts.parser().setSigningKey(secret_key).parseClaimsJws(token).getBody().getSubject();
    UserDetails userDetails = userDetailsService.loadUserByUsername(username);

    return new UsernamePasswordAuthenticationToken(userDetails, "", userDetails.getAuthorities());
  }

  /**
   * http 헤더로부터 bearer 토큰을 가져옴.
   * @param req
   * @return
   */
  public String resolveToken(HttpServletRequest req) {
    String bearerToken = req.getHeader("Authorization");
    if (bearerToken != null && bearerToken.startsWith("Bearer ")) {
      return bearerToken.substring(7);
    }
    return null;
  }

  /**
   * 토큰을 검증
   * @param token
   * @return
   */
  public boolean validateToken(String token) {
    try {
      Jwts.parser().setSigningKey(secret_key).parseClaimsJws(token);
      return true;
    } catch (JwtException e) {
      // MalformedJwtException | ExpiredJwtException | IllegalArgumentException
      throw new CustomException("Error on Token", HttpStatus.INTERNAL_SERVER_ERROR);
    }
  }
}
JWT 토큰을 발행하고,
Payload에 들어간 클레임을 통해 User 객체를 생성하여 Authentication 객체를 반환하고,
HTTP Request Header로부터 토큰을 가져오고,
토큰을 검증하는 모든 기능을 JwtTokenProvider에 구현해주었다.
JwtTokenFilter
// Request 이전에 1회 작동할 필터
public class JwtTokenFilter extends OncePerRequestFilter {
  private JwtTokenProvider jwtTokenProvider;

  public JwtTokenFilter(JwtTokenProvider jwtTokenProvider) {
    this.jwtTokenProvider = jwtTokenProvider;
  }

  @Override
  protected void doFilterInternal(
      HttpServletRequest request,
      HttpServletResponse response,
      FilterChain filterChain
  ) throws ServletException, IOException {
    String token = jwtTokenProvider.resolveToken(request);
    try {
      if (token != null && jwtTokenProvider.validateToken(token)) {
        Authentication auth = jwtTokenProvider.getAuthentication(token);
        // 정상 토큰이면 토큰을 통해 생성한 Authentication 객체를 SecurityContext에 저장
        SecurityContextHolder.getContext().setAuthentication(auth);
      }
    } catch (CustomException e) {
      SecurityContextHolder.clearContext();
      response.sendError(e.getHttpStatus().value(), e.getMessage());
      return;
    }

    filterChain.doFilter(request, response); // 다음 필터 체인 실행
  }
}OncePerRequestFilter를 상속받아 JwtTokenFilter를 구현함으로써
Request마다 1회만 실행되는 필터를 작성해주었다.
OncePerRequestFilter를 사용하면 doFIlter 메서드가 아닌
doFilterInternal 메서드를 Override 하여 정의해주어야 한다.
https://newwisdom.tistory.com/70?category=956402
Servlet과 Spring
2021-06-23글 [10분 테코톡] 🐶 코기의 Servlet vs Spring을 들으며 정리한 글입니다. 서블릿이란 처음 웹 서버는 정적인 페이지만 만들 수 있었음 웹서버에 프로그램을 붙여 동적인 페이지를 생성하기
newwisdom.tistory.com
JwtTokenFilter는
사용자의 요청이 들어오면 Servlet Req, Res 객체가 생성되어 넘어오게 되는데,
Req 객체에서 JWT Token을 추출하고, token을 통해 정상 토큰인지 확인한 후
토큰을 통해 생성한 Authentication 객체를 SecurityContext에 저장해주는 역할을 수행한다.
Authentication 객체는 Spring Security에서 한 유저의 인증 정보를 가지고 있는 객체인데,
Spring Security는 사용자의 principal과 credential 정보를 Authentication 객체에 담아 생성한 후 보관한다.
(여기서 principal은 유저의 식별자, credential은 암호라고 생각하면 된다.)
이때, Authentication 객체를 만드는 과정은 다음과 같다.
jwtTokenProvider.getAuthentication위 메서드로 token을 넘겨주면,
token을 생성할 때 claim으로 넣어줬었던 유저의 이름을
UserDetailsService의 loadUserByUsername 메서드에 넘겨주고,
해당 유저가 존재하는지 확인한다.
존재한다면,
UsernamePasswordAuthenticationToken위 객체를 생성하여 반환해주게 되는데,
이 객체는 Security Context에 저장될 Authentication 객체이다.
Security Context란 Authentication 객체를 보관하는 친구이며,
이 Security Context는 SecurityContextHolder를 통해 접근할 수 있다.
결국, 정리하자면
사용자의 요청이 들어오면 헤더에 담아서 보낸 JWT Token을 통해
Authentication 객체를 생성하여
SecurityContextHolder.getContext().setAuthentication(auth);다음과 같이 Security Context에 저장해둔 것이다.
JwtSecurityConfig
/**
 * SecurityConfigurerAdapter를 확장.
 * JwtTokenProvider를 주입받음.
 * JwtFilter를 통해 Security filterchain에 filter를 추가 등록
 */
@RequiredArgsConstructor
public class JwtSecurityConfig extends SecurityConfigurerAdapter<DefaultSecurityFilterChain, HttpSecurity> {
  private final JwtTokenProvider jwtTokenProvider;

  @Override
  public void configure(HttpSecurity http) throws Exception {
    JwtTokenFilter customFilter = new JwtTokenFilter(jwtTokenProvider);
    http.addFilterBefore(customFilter, UsernamePasswordAuthenticationFilter.class);
  }

}
JwtTokenProvider를 주입받고,
JwtTokenFilter를 생성한 후
UsernamePasswordAuthenticationFilter가 동작하여 아이디, 패스워드를 통해 인증 요청을 진행하기 전에
제작한 Jwt Custom Filter를 추가하여 정상적으로 JWT 토큰을 통한 인증 방식이 작동하도록 해주었다.
여기서 다시
SecurityConfig
@EnableWebSecurity
@RequiredArgsConstructor
public class SecurityConfig {
  // 추가된 jwt 관련 친구들을 security config에 추가
  private final JwtTokenProvider jwtTokenProvider;
  private final JwtAccessDeniedHandler jwtAccessDeniedHandler;
  private final JwtAuthenticationEntryPoint jwtAuthenticationEntryPoint;

  ...

  @Bean
  public AuthenticationManager authenticationManager(
      AuthenticationConfiguration authenticationConfiguration
  ) throws Exception {
    return authenticationConfiguration.getAuthenticationManager();
  }

  @Bean
  public SecurityFilterChain filterChain(HttpSecurity http) throws Exception {
    // Disable csrf to use token
    http
        .csrf().disable();

    ...

    // No session will be created or used by spring security
    http
        .sessionManagement()
        .sessionCreationPolicy(SessionCreationPolicy.STATELESS);

    // exception handling for jwt
    http
        .exceptionHandling()
        .accessDeniedHandler(jwtAccessDeniedHandler)
        .authenticationEntryPoint(jwtAuthenticationEntryPoint);

    // Apply JWT
    http.apply(new JwtSecurityConfig(jwtTokenProvider));

    return http.build();
  }
}
filterchain의 설정은 주석을 통해 설명을 마치고,
@Bean
public AuthenticationManager authenticationManager(
	AuthenticationConfiguration authenticationConfiguration
) throws Exception {
	return authenticationConfiguration.getAuthenticationManager();
}
Spring Security에서 인증을 담당하는 AuthenticationManager를 사용하여 원하는 시점에 인증을 처리하기 위해
추가로 Bean을 등록해주었다.
Spring Security 5.7 버전 이전에는
@Override
@Bean
public AuthenticationManager authenticationManagerBean() throws Exception {
    return super.authenticationManagerBean();
}
위와 같이 작성하여 사용했었지만
5.7.1 버전에서는
@Bean
public AuthenticationManager authenticationManager(AuthenticationConfiguration authenticationConfiguration) throws Exception {
    return authenticationConfiguration.getAuthenticationManager();
}
이와 같이 작성해주어야 사용할 수 있다.
참고 : https://spring.io/blog/2022/02/21/spring-security-without-the-websecurityconfigureradapter
해당 AuthenticationManager Bean을 추가해준 이유는 잠시 후 AuthService에서 자세히 설명하도록 하겠다.
jwtAccessDeniedHandler : 서버에 요청 시 액세스 불가능한 권한의 유저가 요청했을 경우 동작하는 핸들러
jwtAuthenticationEntryPoint : 인증이 되지 않은 유저가 요청을 보냈을 때 동작하는 인터페이스
위 2개는 추가로 작성하여 예외 처리를 위해 적용해주었는데,
이런 추가적인 상세 코드가 궁금하다면 아래 레포지토리로 이동하여 살펴보길 추천한다.
https://github.com/hou27/spring-boot-jwt-example/tree/jwt
GitHub - hou27/spring-boot-jwt-example: Jwt example with Spring Boot
Jwt example with Spring Boot. Contribute to hou27/spring-boot-jwt-example development by creating an account on GitHub.
github.com
AuthModule
AuthController
@Controller
@RequestMapping("/auth")
@RequiredArgsConstructor
public class AuthController {
  private final AuthService authService;

  @GetMapping("/signUp")
  public String signUp() {
    return "user/signUp";
  }

  @PostMapping("/signUp")
  public String signUp(@Validated UserSignUpRequest signUpReq) throws Exception {
    User user = authService.signUp(signUpReq);

    if(!Objects.isNull(user)) {
      return "redirect:/user/signIn";
    }

    return "redirect:/user/signUp";
  }

  @GetMapping("/signIn")
  public String signIn(@RequestParam(value = "fail", required = false) String flag, Model model) {
    model.addAttribute("failed", flag != null);

    return "user/signIn";
  }

  @PostMapping("/signIn")
  public String signIn(@Validated UserSignInRequest signInReq, HttpServletResponse res) {
    ResponseEntity<TokenDto> tokenDtoResponseEntity = authService.signIn(signInReq);
    Cookie cookie = new Cookie(
        "access_token",
        tokenDtoResponseEntity.getBody().getAccess_token()
    );

    cookie.setPath("/");
    cookie.setMaxAge(Integer.MAX_VALUE);

    res.addCookie(cookie);
    return "redirect:/user/profile";
  }
}
기존 user controller에 있던 것과 함께 약간의 추가를 통해
auth controller로 분리하였다.
AuthServiceImpl
@Service
@RequiredArgsConstructor
public class AuthServiceImpl implements AuthService {
  private final UserRepository userRepository;
  private final PasswordEncoder bCryptPasswordEncoder;
  private final JwtTokenProvider jwtTokenProvider;
  private final AuthenticationManager authenticationManager;

  @Override
  @Transactional
  public User signUp(UserSignUpRequest signUpReq) throws Exception {
    System.out.println("signUpReq = " + signUpReq.toString());

    if(userRepository.existsByEmail(signUpReq.getEmail())) {
      throw new Exception("Your Mail already Exist.");
    }
    User newUser = signUpReq.toUserEntity();
    newUser.hashPassword(bCryptPasswordEncoder);
    return userRepository.save(newUser);
  }

  @Override
  public ResponseEntity<TokenDto> signIn(UserSignInRequest signInReq) {
    try {
      Authentication authentication = authenticationManager.authenticate(
          new UsernamePasswordAuthenticationToken(
              signInReq.getEmail(),
              signInReq.getPassword()
          )
      );
      TokenDto tokenDto = new TokenDto(jwtTokenProvider.generateToken(authentication));

      HttpHeaders httpHeaders = new HttpHeaders();
      httpHeaders.add("Authorization", "Bearer " + tokenDto.getAccess_token());

      return new ResponseEntity<>(tokenDto, httpHeaders, HttpStatus.OK);
    } catch (AuthenticationException e) {
      throw new CustomException("Invalid credentials supplied", HttpStatus.UNPROCESSABLE_ENTITY);
    }
  }
}
auth를 위한 service이다.
여기서 주의 깊게 살펴볼 코드는 바로
signIn
@Override
public ResponseEntity<TokenDto> signIn(UserSignInRequest signInReq) {
    try {
      Authentication authentication = authenticationManager.authenticate(
          new UsernamePasswordAuthenticationToken(
              signInReq.getEmail(),
              signInReq.getPassword()
          )
      );
      TokenDto tokenDto = new TokenDto(jwtTokenProvider.generateToken(authentication));

      HttpHeaders httpHeaders = new HttpHeaders();
      httpHeaders.add("Authorization", "Bearer " + tokenDto.getAccess_token());

      return new ResponseEntity<>(tokenDto, httpHeaders, HttpStatus.OK);
    } catch (AuthenticationException e) {
      throw new CustomException("Invalid credentials supplied", HttpStatus.UNPROCESSABLE_ENTITY);
    }
}
이 부분이다.
/auth/signin 경로로
로그인 요청이 들어오면, 우선 인증을 위한 2가지를 통해
아까 위에서도 살펴봤던 UsernamePasswordAuthenticationToken을 생성한다.
나의 경우엔 Email과 Password가 그 재료이다.
다시 말하지만 UsernamePasswordAuthenticationToken은 Authentication를 구현한 클래스로,
인증 완료 후 Spring Security에게 전달할 친구이다.
이렇게 만들어준 UsernamePasswordAuthenticationToken을
AuthenticationManager에게 넘겨주게 되는데,
이 친구는 인자로 받은 Authentication의 유효성을 검토하고,
Authentication 객체를 반환해준다.
AuthenticationManager는 인증을 처리하는 방법을 정의한 친구로,
AuthenticationManager의 authenticate() 메서드를 통해 Spring Security에 구현된 인증 절차를 진행하게 된다.
그렇게 반환받은 Authentication 객체를 통해 JWT Token을 발행하고,
ResponseEntity를 생성하여 반환해주었다.
UserModule
UserController
@Controller
@RequestMapping("/user")
@RequiredArgsConstructor
public class UserController {
  private final UserService userService;

  @GetMapping("/profile")
  public String profile(Model model, @AuthenticationPrincipal UserDetails userDetails) {
    System.out.println("userDetails = " + userDetails);
    if (userDetails != null) {
      User userDetail = userService.findByEmail(userDetails.getUsername())
          .orElseThrow(() -> new UserNotFoundException());

      model.addAttribute("userDetail", userDetail);
    }

    return "user/profile";
  }

  ...
}
마지막으로 UserController의 profile을 살펴보자.
@AuthenticationPrincipalAuthenticationPrincipal이라는 어노테이션을 사용한 것을 볼 수 있는데,
이 어노테이션은 Spring Security를 사용하는 경우에
AuthenticationPrincipalArgumentResolver 클래스를 활용하여
resolveArgument 메서드를 구현하고, Security Context에 저장된 Authentication 객체를 꺼내오게 된다.
아래는 직접 확인한 실제 구현부이다.
package org.springframework.security.web.method.annotation;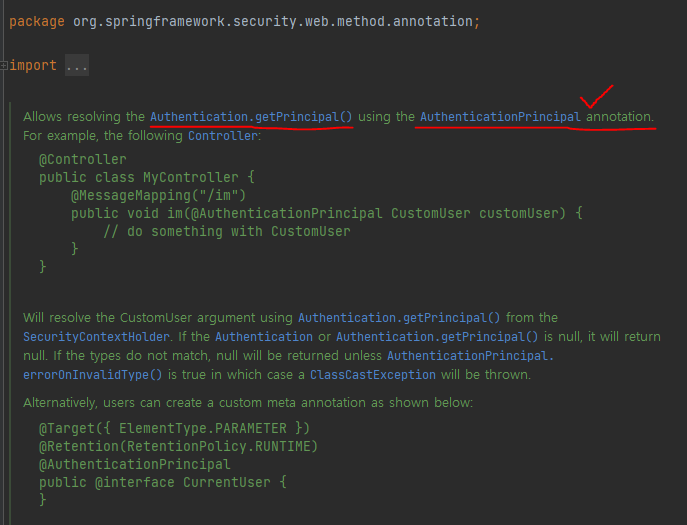
위 사진의 밑줄 친 부분을 보면,
AuthenticationPrincipal 어노테이션을 사용하여
Authentication.getPrincipal()을 사용할 수 있다는 것을 알 수 있다.
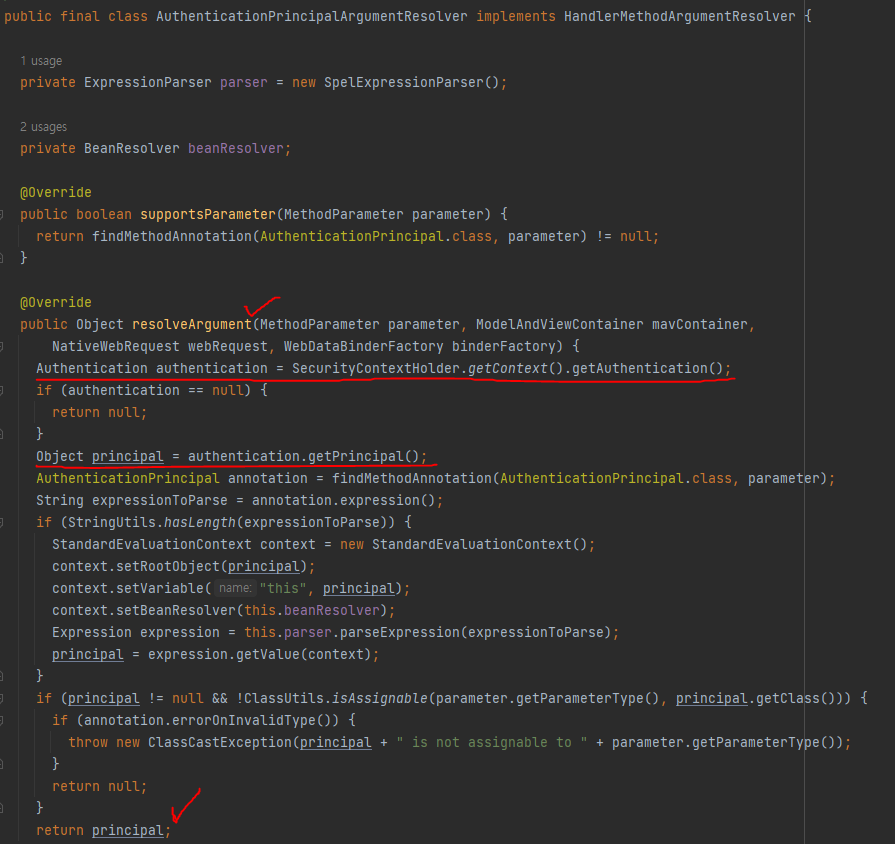
resolveArgument 메서드를 통해
Security Context에서 Authentication 객체를 꺼내고,
그 객체에서 Principal을 꺼내어 반환하는 모습이다.
결국 /user/profile로 Get 요청이 들어오면
Controller로 가기 전 JWT Filter에서 Token를 통해 Security Context에 담아둔 인증 객체를
Controller에서 @AuthenticationPrincipal를 통해 받게 되는 것이다.
Postman으로 테스트
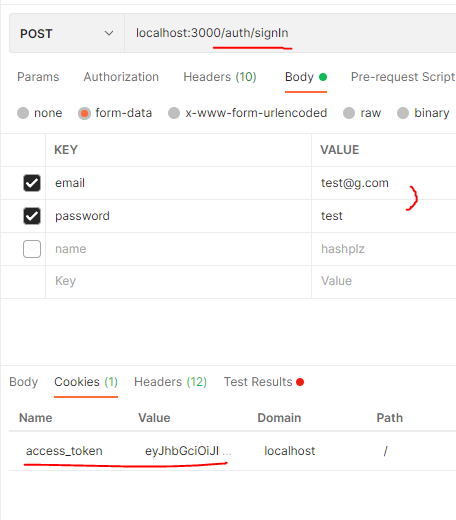
/auth/signIn에 POST로 로그인 요청했더니
Cookies에 access_token이 생긴 모습이다.
(AuthController를 확인해보면 Cookie에 저장하도록 코드를 작성해두었었다.)
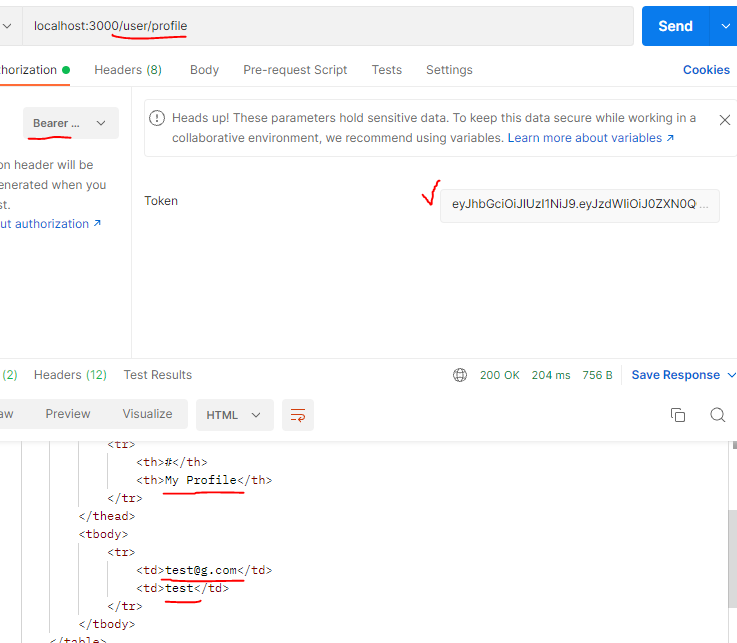
그 토큰을 authorization header에 Bearer 토큰으로 담아
user/profile으로 요청을 보냈더니 해당 유저의 정보가 담긴 html이 반환되는 모습을 확인할 수 있었다.
성공!!
아래 레포지토리에서 전체 코드를 확인할 수 있습니다.
https://github.com/hou27/spring-boot-jwt-example/tree/jwt
GitHub - hou27/spring-boot-jwt-example: Jwt example with Spring Boot
Jwt example with Spring Boot. Contribute to hou27/spring-boot-jwt-example development by creating an account on GitHub.
github.com
참고자료
'Backend > Spring' 카테고리의 다른 글
| [Spring boot] Swagger로 API 문서화하기 (0) | 2022.07.02 |
|---|---|
| [Spring Boot] Redis와 함께 Refresh Token 구현하기 (0) | 2022.06.17 |
| Spring Security - 세션 인증 (4) | 2022.05.29 |
| @RequestBody, @ModelAttribute 그리고 Argument Resolver (2) | 2022.05.20 |
| [Spring Boot] Spring Security 적용하기 - 암호화 (2) | 2022.05.20 |