프로젝트를 진행하면서 사용자 시스템을 구축한다면 필연적으로 인증 로직도 구현해야한다.
이 과정에서 만약 사용자의 비밀번호를 평문(Plain Text)으로 저장한다면, 심각한 보안상 문제를 초래하게 된다.
그렇기 때문에 반드시 암호화하여 관리해야만 한다.
암호화? 해싱?
해싱과 암호화 두 단어가 이런 류의 포스트에서 마구 등장해 헷갈릴 수 있다.
해싱(Hashing)과 암호화(Encryption) 모두 데이터의 보안을 위해 사용하는 것이지만,
가장 큰 차이점은
Hash는 단방향 암호화 기법이고
Encryption는 양방향 암호화 기법이라는 것이다.
때문에 비밀번호를 저장할 때는 행여나 탈취될 가능성을 염두에 두어
평문을 암호화하는 것은 가능하지만 다시 평문으로 복호화하는 것은
불가능한 단방향 암호화 방식을 사용한다.
같은 데이터를 같은 해시 알고리즘을 통해 암호화할 경우 항상 같은 결과가 나오기 때문에
복호화가 불가능해도 사용자 인증은 가능하다.
Spring Security
Spring Security
Spring Security is a framework that focuses on providing both authentication and authorization to Java applications. Like all Spring projects, the real power of Spring Security is found in how easily it can be extended to meet custom requirements
spring.io
공식 문서를 살펴보면
Spring Security is a powerful and highly customizable authentication and access-control framework. It is the de-facto standard for securing Spring-based applications.
위와 같이 Spring 기반의 Application의 보안을 위한 Spring의 프레임워크라고 설명되어 있다.
보안(인증과 권한) 관련 처리를 Filter 기반으로 처리하며,
기본적으로 Session - Cookie 방식으로 인증 정보를 처리한다.
Spring에서 password를 암호화하기 위해,
Spring Boot 프로젝트에 Spring Security를 적용하기 위한 포스트이므로 설명은 간단히 마치고
Gradle 프로젝트로 진행해보도록 하겠다.
1. 의존성 주입
build.gradle에

위와 같이 dependency를 추가해준다.
https://mvnrepository.com/artifact/org.springframework.boot/spring-boot-starter-security/2.6.7
Maven Repository: org.springframework.boot » spring-boot-starter-security » 2.6.7
Starter for using Spring Security org.springframework.boot spring-boot-starter-security 2.6.7 // https://mvnrepository.com/artifact/org.springframework.boot/spring-boot-starter-security implementation group: 'org.springframework.boot', name: 'spring-boot-s
mvnrepository.com
2. 설정
Spring Security를 사용하기 위해선
PasswordEncoder
public interface PasswordEncoder {

	/**
	 * Encode the raw password. Generally, a good encoding algorithm applies a SHA-1 or
	 * greater hash combined with an 8-byte or greater randomly generated salt.
	 */
	String encode(CharSequence rawPassword);

	/**
	 * Verify the encoded password obtained from storage matches the submitted raw
	 * password after it too is encoded. Returns true if the passwords match, false if
	 * they do not. The stored password itself is never decoded.
	 * @param rawPassword the raw password to encode and match
	 * @param encodedPassword the encoded password from storage to compare with
	 * @return true if the raw password, after encoding, matches the encoded password from
	 * storage
	 */
	boolean matches(CharSequence rawPassword, String encodedPassword);

	/**
	 * Returns true if the encoded password should be encoded again for better security,
	 * else false. The default implementation always returns false.
	 * @param encodedPassword the encoded password to check
	 * @return true if the encoded password should be encoded again for better security,
	 * else false.
	 */
	default boolean upgradeEncoding(String encodedPassword) {
		return false;
	}

}
위 PasswordEncoder라는 인터페이스를 이용해야한다.
PasswordEncoder란
모든 Spring Security의 비밀번호 Encoder는 위 PasswordEncoder 인터페이스를 구현한다.
이 인터페이스에는 평문인 비밀번호를 암호화하는 encode(),
평문 비밀번호를 인코딩(암호화)된 비밀번호와 비교하는 matches()가 존재한다.
필자가 사용할 구현체는
BCryptPasswordEncoder
클래스로, 설명은 아래와 같다.
Implementation of PasswordEncoder that uses the BCrypt strong hashing function. Clients can optionally supply a "version" ($2a, $2b, $2y) and a "strength" (a.k.a. log rounds in BCrypt) and a SecureRandom instance. The larger the strength parameter the more work will have to be done (exponentially) to hash the passwords. The default value is 10.
Author: Dave Syer
BCrypt의 강력한 해시 기능을 사용하기 위해 이제 설정을 해주어야 한다.
Config file
/**
 * Spring Security 사용을 위한 Configuration Class를 작성하기 위해서
 * WebSecurityConfigurerAdapter를 상속하여 클래스를 생성하고
 * @Configuration 애노테이션 대신 @EnableWebSecurity 애노테이션을 추가한다.
 */
@EnableWebSecurity
public class SecurityConfig extends WebSecurityConfigurerAdapter {
  /**
   * PasswordEncoder를 Bean으로 등록
   */
  @Bean
  public BCryptPasswordEncoder bCryptPasswordEncoder() {
    return new BCryptPasswordEncoder();
  }

  /**
   * 인증 or 인가에 대한 설정
   */
  @Override
  protected void configure(HttpSecurity http) throws Exception {
    http
        .csrf().disable() // post 방식으로 값을 전송할 때 token을 사용해야하는 보안 설정을 해제
        .authorizeRequests()
        .antMatchers("/", "/user/signUp").permitAll()
        .anyRequest().authenticated();
  }
}
PasswordEncoder interface의 구현체 중 BCrypt 알고리즘을 사용한 구현체인
BCryptPasswordEncoder를 Bean으로 등록해주고,
추가적인 설정을 해주었다.
Spring Security의 각종 설정은 HttpSecurity로 한다.
antMatchers
.antMatchers("/", "/home").permitAll()특정 URL을 설정하며,
여기서 뒤에 붙은 permitAll()은 antMatchers에서 설정한 URL의 접근을 인증없이 허용한다는 뜻이다.
hasAnyRole
antMatchers("/admin/**").hasAnyRole("ADMIN")antMatchers로 설정한 URL들은 ADMIN 권한의 유저만 허용한다는 뜻이다.
anyRequest
anyRequest().authenticated()이 옵션은 모든 리소스가 인증을 해야만 접근이 허용된다는 뜻이다.
보통 이 옵션 이전에 다른 설정을 완료하고 나머지에 위 옵션을 적용한다.
이 외의 많은 옵션들은 아래 포스트에서 참고했다.
[Spring Security] 스프링시큐리티 설정값들의 역할과 설정방법(2)
스프링시큐리티의 여러가지 설정값들의 역할과 설정방법을 상세히 알아봅니다. Spring Security 커스텀 필터를 이용한 인증 구현 - 스프링시큐리티 설정(2) 본 포스팅은 스프링시큐리티의 전반적인
kimchanjung.github.io
User Entity
@Entity
@Getter @Setter
@NoArgsConstructor
@ToString
public class User extends CoreEntity {
  ...

  /**
   * 비밀번호를 암호화
   * @param passwordEncoder 암호화 할 인코더 클래스
   * @return 변경된 유저 Entity
   */
  public User hashPassword(PasswordEncoder passwordEncoder) {
    this.password = passwordEncoder.encode(this.password);
    return this;
  }

  /**
   * 비밀번호 확인
   * @param plainPassword 암호화 이전의 비밀번호
   * @param passwordEncoder 암호화에 사용된 클래스
   * @return true | false
   */
  public boolean checkPassword(String plainPassword, PasswordEncoder passwordEncoder) {
    return passwordEncoder.matches(plainPassword, this.password);
  }
}
다음으로 User Entity에 PasswordEncoder를 사용하여 인코딩하고,
비밀번호가 맞는지 확인하는 메소드를 구현해주었다.
User Service
@Service
@RequiredArgsConstructor
@Transactional
public class UserServiceImpl implements UserService {
  private final UserRepository userRepository;
  private final PasswordEncoder bCryptPasswordEncoder;

  @Override
  public User signUp(UserSignUpRequest signUpReq) throws Exception {
    if(this.isEmailExist(signUpReq.getEmail())) {
      throw new Exception("Your Mail already Exist.");
    }
    User newUser = signUpReq.toUserEntity();
    newUser.hashPassword(bCryptPasswordEncoder);
    return userRepository.save(newUser);
  }

  ...

  /**
   * 이메일 중복 여부를 확인
   *
   * @param email
   * @return true | false
   */
  private boolean isEmailExist(String email) {
    Optional<User> byEmail = userRepository.findByEmail(email);
    return !byEmail.isEmpty();
  }
}
그 후 User Service에서 회원가입 진행 시(signUp 메서드),
생성자를 통해 주입받은 PasswordEncoder를 이용하여 비밀번호를 해싱한 후,
저장하도록 하였다.
User Controller
@RestController
@RequestMapping("/user")
@RequiredArgsConstructor
public class UserController {
  private final UserService userService;

  @PostMapping("/signUp")
  public User signUp(@ModelAttribute @Validated UserSignUpRequest signUpReq) throws Exception {
    return userService.signUp(signUpReq);
  }

  ...
}
컨트롤러에선 /user/signUp에 POST 요청이 들어오면 회원가입을 진행할 수 있도록 해주었다.
보통의 경우라면 User Entity를 반환하지 않지만 지금은 테스트를 위해 위와 같이 작성하였다.
Test Code
@SpringBootTest
@Transactional
@DisplayName("User Service Test")
class UserServiceTest {
  private static final String EMAIL = "test@email.com";
  private static final String PASSWORD = "12345";
  private static final String NAME = "김정호";
  private UserService userService;

  @Autowired
  private UserRepository userRepository;
  @Autowired
  private PasswordEncoder bCryptPasswordEncoder;

  @BeforeEach
  public void beforeEach() {
    AppConfig appConfig = new AppConfig(userRepository, bCryptPasswordEncoder);
    userService = appConfig.userService();
  }

  ...

  @Test
  @DisplayName("비밀번호는 암호화되어야 한다.")
  void hashPassword() throws Exception {
    // given
    UserSignUpRequest user = createSignUpRequest();

    // when
    User newUser = userService.signUp(user);

    // then
    System.out.println("newUser pw = " + newUser.getPassword());
    assertThat(newUser.getPassword()).isNotEqualTo(PASSWORD);
  }

  ...

  private UserSignUpRequest createSignUpRequest() {
    return UserSignUpRequest.builder()
        .email(EMAIL)
        .password(PASSWORD)
        .name(NAME)
        .build();
  }
}
Test 코드를 작성하여 확인을 진행하겠다.

테스트는 성공하였으며,
위 사진에 표시한 출력문을 살펴보면 비밀번호가 잘 해싱되었음을 확인할 수 있다.
이번엔 Postman을 통해 확인해보겠다.
Postman
Spring Security 적용 전에는,
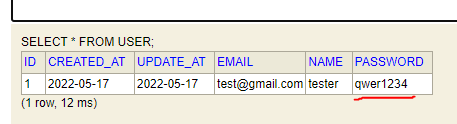
위와 같이 비밀번호가 평문 그대로 DB에 저장되었었다.
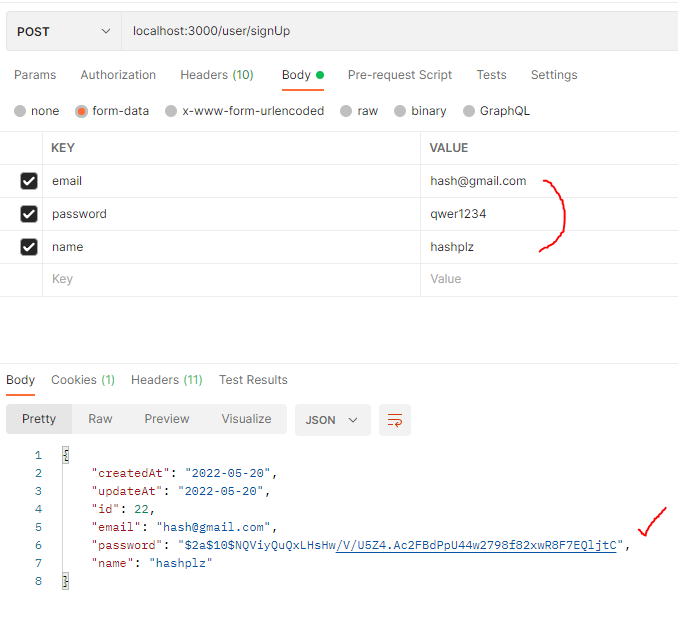
Spring Security를 적용한 후 테스트해보니,
위와 같이 반환받은 User Entity에 password가 암호화되어있었으며

DB에도 역시나 암호화된 값이 들어있었다.
성공!!
참고자료
'Backend > Spring' 카테고리의 다른 글
| Spring Security - 세션 인증 (4) | 2022.05.29 |
|---|---|
| @RequestBody, @ModelAttribute 그리고 Argument Resolver (2) | 2022.05.20 |
| Spring Bean 등록하기 - 2가지 방법 (0) | 2022.05.03 |
| Spring 프로젝트 실행 - with Intellij (from WSL) (0) | 2022.05.01 |
| Spring Boot 프로젝트 생성하기(WSL) - Spring Initializr (0) | 2022.05.01 |